
Installing a wood-burning stove in your living room is one of the best ways to bring warmth, character, and energy efficiency into your home. It not only creates a cozy atmosphere but also helps reduce heating costs and promotes sustainable living by using renewable wood fuel. However, proper installation is crucial to ensure safety and maximize the stove’s performance.
This guide will take you through the steps of safely and efficiently installing a wood-burning stove in your living room. For premium wood-burning stoves, installation accessories, and expert advice, Caledonian Stoves is a trusted supplier with an extensive range of products to suit every home.
Benefits of Installing a Wood-Burning Stove in Your Living Room
Before we dive into the Wood burning stove installation steps, let’s briefly cover why a wood-burning stove is a fantastic addition to your living space:
- Energy Efficiency: Wood-burning stoves are an excellent way to reduce heating bills by using a renewable, carbon-neutral fuel source. Wood stoves can produce more heat with less fuel compared to traditional open fireplaces.
- Eco-Friendly: Burning wood produces fewer greenhouse gases than fossil fuels. Properly managed wood supplies can be a sustainable energy source.
- Aesthetic Appeal: A wood-burning stove creates a focal point in the living room, adding a touch of rustic charm and a cozy atmosphere, perfect for family gatherings.
- Independence from the Grid: During power outages, a wood-burning stove provides a reliable heat source, keeping your home warm even when the electricity goes out.
Step-by-Step Guide to Installing a Wood-Burning Stove in Your Living Room
Now, let’s walk through the key steps to safely install a wood-burning stove in your living room.
Step 1: Choose the Right Stove for Your Space
The first step in the installation process is selecting the correct wood-burning stove for your living room. It’s essential to choose a stove that fits both the style and size of your room while meeting heating requirements.
- Size and Heating Capacity: A wood-burning stove must be appropriately sized for your living room to ensure efficient heating. Measure your living space and consult your stove’s BTU (British Thermal Unit) rating to determine its heat output.
- Efficiency Rating: Modern stoves come with efficiency ratings that indicate how well the stove converts fuel into heat. Choose a high-efficiency model to get more heat from less wood.
- Style and Design: Wood stoves come in various styles and finishes, from sleek modern designs to traditional cast-iron models. Choose one that complements your living room décor.
If you’re unsure which stove is best for your living room, Caledonian Stoves offers a range of high-quality stoves to suit all room sizes, styles, and heating needs.
Step 2: Check Local Building Regulations and Permits
Before you begin the installation process, check with your local building authority to understand the regulations governing wood-burning stove installations. These rules are in place to ensure safety and proper ventilation.
- Permits: In most areas, you will need a permit to install a wood-burning stove. The permit ensures that the installation is carried out safely and meets all local building codes.
- Building Codes: Building regulations often cover aspects such as clearances between the stove and combustibles, chimney height, and venting systems. Make sure to comply with these codes to avoid issues with inspections and insurance claims.
- Post-Installation Inspection: Many regions require a professional inspection after installation to ensure everything is safe and up to standard.
Adhering to these codes is essential for the safety of your home. Caledonian Stoves can provide guidance to ensure your installation meets all necessary requirements.
Step 3: Choose a Safe Location for the Stove
The placement of your wood-burning stove in the living room is crucial for both safety and efficiency. Here are a few things to consider when choosing the ideal spot:
- Central Placement: For optimal heat distribution, place the stove in a central location. This will help the heat spread evenly throughout the room, maximizing comfort.
- Clearances from Combustibles: Make sure there is ample space between the stove and combustible materials like furniture, curtains, and walls. Most manufacturers recommend at least 36 inches of clearance, but it’s important to check your specific stove’s manual.
- Ventilation Requirements: Ensure the stove is positioned where you can install proper ventilation, such as a chimney or flue system. Adequate ventilation is key to safely vent smoke and gases out of your home.
Caledonian Stoves can assist you in choosing the best location for your stove, ensuring it complies with safety regulations and is placed for maximum efficiency.
Step 4: Install the Chimney or Flue System
A well-designed chimney or flue system is vital for venting smoke, gases, and particulates out of your home. Depending on your home’s setup, you’ll either connect to an existing chimney or install a new flue system.
- Existing Chimney: If your home already has a chimney, you may be able to connect your stove to it. However, it’s essential to have the chimney inspected and cleaned beforehand. You may also need to install a flue liner to improve draft efficiency and reduce creosote buildup.
- New Flue System: If you don’t have a chimney, a twin-wall insulated flue system can be installed. This type of flue can be routed through the roof or an exterior wall, depending on your living room layout.
- Chimney Height: Ensure that the chimney or flue extends at least three feet above the roofline to create the proper draft and prevent backdrafting.
Caledonian Stoves offers a wide range of flue systems and chimney components, ensuring you have everything needed for a safe and efficient installation.
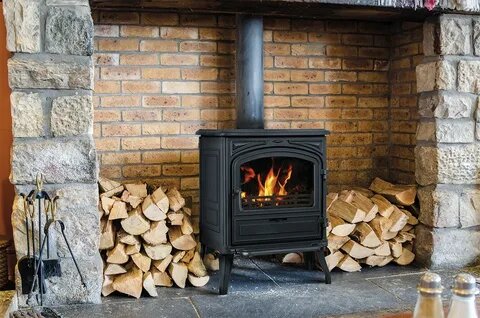
Step 5: Prepare the Hearth
A hearth is a non-combustible surface that sits under the wood-burning stove, protecting your flooring from heat, sparks, and embers.
- Hearth Materials: Common materials for hearths include stone, brick, tile, or concrete. These materials are heat-resistant and durable.
- Hearth Size: The hearth should extend at least 18 inches in front of the stove and 12 inches on the sides. This ensures that any sparks or embers that escape won’t land on combustible surfaces like carpet or wood floors.
Installing a hearth is not only necessary for safety, but it also adds a decorative element to your living room. Caledonian Stoves provides a variety of hearth options to fit different styles and preferences.
Step 6: Connect the Stovepipe
The stovepipe is the metal duct that connects your wood-burning stove to the chimney or flue. Proper installation of the stovepipe is key to ensuring that smoke is safely vented out of your home.
- Fitting the Stovepipe: Attach the stovepipe to the stove’s flue collar, ensuring that all sections of the pipe are tightly secured with stovepipe screws.
- Sealing Joints: Use a high-temperature sealant on all joints to prevent smoke from leaking into your living room. Proper sealing also improves the stove’s efficiency.
Caledonian Stoves offers premium stovepipes and connectors, ensuring a secure and reliable installation.
Step 7: Install Smoke and Carbon Monoxide Detectors
Safety should always be a priority when installing a wood-burning stove. Installing smoke and carbon monoxide detectors is a must to protect your family from potential dangers.
- Smoke Detectors: Install smoke detectors near the ceiling, as smoke rises. Test them regularly to ensure they are working properly.
- Carbon Monoxide Detectors: Carbon monoxide is a colorless, odorless gas that can be deadly if undetected. Install detectors at eye level in the room where the stove is located, and make sure they are working efficiently.
Caledonian Stoves emphasizes the importance of safety and recommends always having these detectors installed near any wood-burning stove.
Step 8: Light Your First Fire
Once the stove is installed and safety measures are in place, you’re ready to light your first fire.
- Small Break-In Fires: Start with small fires to allow the stove’s materials to cure and prevent damage from excessive heat. This also helps burn off any odors from paint or sealants used during the installation.
- Ventilation: Ensure your living room is well-ventilated during the first few fires, as there may be a slight odor during the break-in period.
Step 9: Maintain Your Stove Regularly
Routine maintenance is essential to keeping your wood-burning stove operating safely and efficiently. Key maintenance tasks include:
- Chimney Cleaning: Creosote buildup in the chimney or flue can lead to dangerous chimney fires. Schedule an annual chimney cleaning to reduce this risk.
- Inspect the Stovepipe: Check the stovepipe for signs of wear, cracks, or leaks. Replace any worn components as needed.
Caledonian Stoves offers a full range of maintenance products and tools to help keep your stove in top condition.
Conclusion
Installing a wood-burning stove in your living room is a fantastic way to enhance both the ambiance and energy efficiency of your home. By following this step-by-step guide, you can safely install and enjoy the benefits of a wood-burning stove for years to come.
For expert advice, high-quality stoves, and installation materials, visit Caledonian Stoves, the leading source for everything you need to complete a successful wood stove installation.